Showing posts with label DIY. Show all posts

Thursday, September 29, 2011

sign language

The current house that we live in has very little images/paintings on our walls...sometimes it feels more like a rental, but that has finally changed.  I've made some great buys at Michael's and Hobby Lobby here in town, but I'm still searching for the right combo before I hang everything up on the wall.

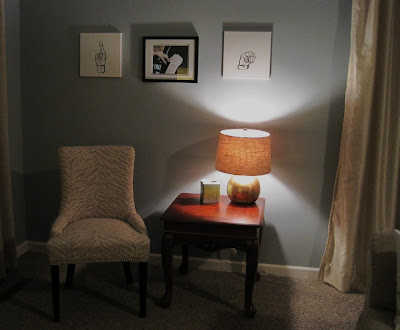
I also picked up a 7 pack of 12x12 canvases while shopping the other day and made use of two of 'em tonight.  L's sister got married in April (it was one of the most beautiful weddings I've ever been to--it was even blogged about, here) and the photographer (little bit 'o sunshine) snapped a shot of me fixing L's handkerchief...I eventually framed it and the photo has been sitting around the house for several months (typical!)

Anyway, back to the present...so I thought let's do something with initials.  I googled clip art for M & R for our last names and found an image of R in sign language - ding! I could draw out the initials in sign language on the canvases and incorporate the picture somehow - perfect!  Honestly, I think it took me longer to hang the pictures (I'm terrible at being precise...not my forte) than it did to draw and paint the images.

Materials used:
- black acrylic liquitex basics paint
- two 12x12 canvases
- pencil
- paint brush

Here is the final result:


Enjoy!

Wednesday, August 24, 2011

inexpensive kitchen backsplash idea!

So, after fixing up a house on the side with L...aka detailed painting in the nooks and crannies of the house...I rarely want to do any work on our house. Ever.  I have one week of freedom (kind of) left before school starts and runs my life again.  Boy have I taken advantage of that!  Touch up paint throughout the house: check, fix holes in the wall: check, kitchen backsplash: check, clean: check....is it messy already? major check.  oops!

Anyway, so our budget doesn't exactly have room for a pretty tiled backsplash...but we do have room for some craft paint and stencils!  Off to Michael's I went in search of some inspiration for crafting....and I walked out with some Martha Stewart stencils and Folk Art paint in Champagne, meowza!  I also remembered while purchasing my lovely champagne colored paint a post from Young House Love.  This post from YHL was of little miss Clara's closet makeover....it involved a potato and paint - Sherry and John = creative!

On to the kitchen!

Unfortunately I don't have a before close up of the kitchen backsplash.  We used Benjamin Moore's Azores on the wall and Wedgewood Grey throughout the rest of the kitchen.


The secret weapon.
The final result - an iridescent sunburst stencil on the wall for a little extra something.  Love it!

You can see the stencil prints from certain angles..you can barely even see the stenciling on the left side of the wall, but they're there...I promise!
 The project was an hour labor of love...put on the Pandora and paint away! I did not measure the spacing between the stenciling, just eyeballed everything and used scotch tape to keep the stencil in position.

Now all we need is a dishwasher....hmmm! :)

Stencils and s'mores,


Wednesday, August 17, 2011

Recycle!

Earlier this year I went garage sale hunting with a good buddy and the two big finds of the day: girl scout cookies and a wooden crate for $1.50....who can beat cookies and a $1.50 find?
cookie monster!

The coveted wooden crate!
Time to do some work!  We were in need of a recycling bin for our cans that we take back to the store (hello there 10 cent refund - directly into the vacation jar! woot woot!)  I had been hunting for a crate for awhile...there were some awesome vintage finds (old crates for cherries, soda, etc) but they were 15 bucks a piece and I couldn't really see the point when I knew I wanted the bin to say recycle.  Alas, my crate and I were united.  I used stencil letters and chalk to outline where I wanted it to say recycle.  **In hindsight, I probably should've had the word recycle going on a diagonal rather than horizontal, but oh well!**
One letter left to go! (:

Fill in the chalk lettering with your choice of paint - I used Dazzling Metallics Elegant Finish in Crystal Green (green only seemed fitting for the project!) from Michael's.  This is a really quick project - perfect for a rainy afternoon :)
In all her glory...full to the brim.


You could certainly use this idea for more than recycling - you could have a towel crate, or even store toilet paper in your bathroom; if you have kids - each kid could decorate their own bin and keep the crate by the front door as the drop box for backpacks, shoes, hats, etc; or could store magazines and books in a crate, DVDs...anything you want really! Sky is the limit :) What would you use a wooden bin for?

Happy recycling :)


Wednesday, August 3, 2011

makeover of a garage sale find!

A few weeks back, I was riding in the car with my pops and drove by a massive garage sale...this resulted in giddy excitement.  Sadly, pops had a meeting he needed to get to and we couldn't stop.  As soon as I had access to a car I headed over to this treasure trove.  The fruits of my labor resulted in these beauts:


2 dollars a piece...jackpot!

I was in need of some chairs to go with the back porch table....in fact the porch hasn't been used once this summer, depressing? I think yes.  I meandered over to Joann Fabrics and Crafts in search of some lovely fabric for my new found friends.  I ended up with a gorgeous outdoor blue and white patterned fabric.  Outdoor fabric is typically a pretty penny compared to indoor fabrics - good news though, Joann's usually has coupons out for around 40% off...use 'em!

The pending project sat in my garage for about a week...or maybe two? until I finally got down to business.  I hit up my favorite homestore ever, Lowe's, to buy some Valspar gloss spray paint in white.  It took just shy of four cans to complete the painting of the chairs - I would suggest just purchasing paint in a can as it would probably be a better bang for your buck...I was just feeling lazy ;)

The final product turned out a little something like this:


care to take a seat?

baby got back.

finished product.

I suggest sanding any project you're about to work on (assuming it's wood!) and depending on the color you're wanting to paint the project you may or may not want to prime.  Since I painted the chairs white, I didn't prime these puppies, just did several coats of paint. 

For reupholstering the chair, I'm definitely not an expert.  I traced the pattern of the seat onto the back of the fabric leaving enough room to have an ample amount of fabric for stapling.  It is entirely up to you on whether or not you would like to replace the foam padding (craft stores will have this!) I get a little excited when I do projects and I didn't replace the padding...it would've been an extra trip into town and I just wanted to get down to business - plan ahead!  Once you've sorted your foam and fabric begin to staple the fabric cut out onto the backside of the seat.  I'm still trying to figure out the best way to staple corners so if anyone out there has some tips, I'd LOVE to hear from you!!  Make any tweaks necessary and then you're ready to re-attach the seat to your newly painted chair!

Garage sale season = love.  Happy hunting!